

This blog post is about the windshield wiper motor I bought to build my own workaround bridge ventilator. Windshield wiper motors are available around the world, they a very strong and durable. They are easy to control with a few electronic components which are not very expensive and available around the world as well.
I decided to use an ESP8266 NodeMCU as micro controller unit. This MCU is very cheap and has a build in WIFI module. With the I²C bus of the ESP8266 it is very easy to connect sensors, controllers and even a cheap OLED display to show some status information’s.
To control the motor driver I have chosen a PCA9685 servo controller. With this controller it is very easy to generate a HIGH signal and a PWM signal. With the HIGH signal I am able to set the rotation direction. With the PWM signal the speed of the windshield wiper motor is controlled.
As motor driver I have chosen a very strong one the BTS7960B. I have already used them in different robots with strong 12V DC motors. This BTS7960B motor driver is perfect to control a windshield wiper motor for a long time.
I do not have a step down-converter to generate 5V out of the 12V to power the electronics. That’s the reason why I am using a Power Bank in my test setup.
The picture below shows my test setup to develop the software and to test the windshield wiper motor.
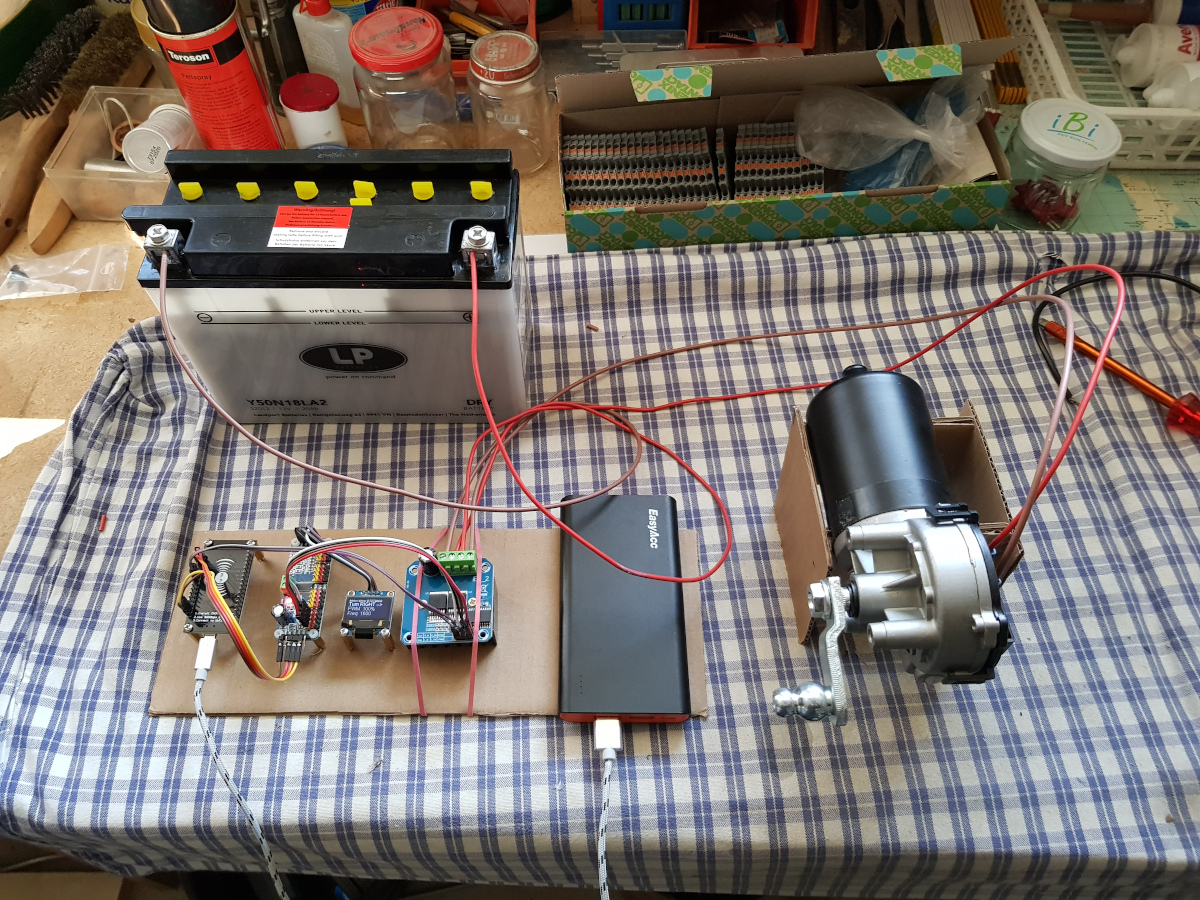
DIY ventilator construction wiper motor control
Wires and Software
The program to test the basic functionality of the windshield wiper motor is developed to run on an ESP8266 NodeMCU. With the very good documented libraries form Adafruit it was very easy to write the test program. The most important part is to understand how the BTS7960B motor driver is controlled over the different pins (R_EN,L_EN, RPWM and LPWM).
The table below shows how to connect the motor driver with the PCA9685 servo controller. To connect the motor driver you will need six female-to-female jumper wires.
| BTS7960B pins | PCA9685 pins | Description |
| VCC | 3,3V | 3,3V from the ESP8266 oder PCA9685 |
| GND | GND | GND |
| R_IS | ||
| L_IS | ||
| R_EN | Channel 1 | Enable the H-Bridge R |
| L_EN | Channel 3 | Enable the H-Bridge L |
| RPWM | Channel 0 | PWM signal to turn the motor to the right |
| LPWM | Channel 2 | PWM signal to turn the motor to the left |
The program is available for download here. Please be aware that you have to install a few additional libraries. For more details please visit my robot car blog and read the following post:
Building robots with the ESP8266 development board – Setting up the Arduino development environment
The program itself is available for download here:
ESP8266 NodeMCU BTS7960B program
Video
The video shows the windshield wiper motor controlled by the ESP8266 NodeMCU. The program does not do anything special but shows the basic functions how to set the speed and direction of the motor.
The next video shows my setup with the modified program that the windshield wiper motor is turning in both directions.
Summary
The setup I have choosen is very cheap and I believe it does his job around the world. The 12V car battery or any 12V power supply will be enough to run the workaround bridge ventilator. Now with the windshield wiper motor turning in different speeds and directions I have a chance to build my own workaround bridge ventilator. The next challenge will be to connect the different sensors I need to complete the workaround bridge ventilator and to build a frame for all the components. But for now I am very happy with my setup.


Dear Ingmar
I am trying to use the wiper motor, but the problem is the difference between forward and backward speed. The difference propagates position drift. I can reduce the forward speed but since there would be a little mismatch that little mismatch between the speed of forward and backward propagates position mismatch through time. Do you have any suggestions? I want the forward and backward speed exactly the same as a clock. Is this possible?
Bests,
Hadi
Hi, the best solution will be an encoder to continuously measure the speed.