


I wanted to deal with the topic of photogrammetry for a long time. Now I have finally found the time to get into the subject and would like to share my knowledge here with you. I started with the construction of a turntable and camera system to record the necessary images of the object which I would like to have later as a 3D model. It is important to understand that photogrammetry is one of several non-contact measurement techniques that are very well suited to map objects as a digital twin for e.g. industrial quality assurance, for the generation of synthetic data or for component development and verification. Once you understand how photogrammetry works and have the process under control, there are many applications for this technique.
Now I would like to introduce my setup which I use to record images automatically. Because this part is quite time consuming and not really exciting. Therefore it is worthwhile to automate this step of the image recording as good as possible. For my setup I assume that objects with a volume of about 50cm x 50cm + 50cm should be digitized. I would limit the weight to about 8kg which my solution can handle. Of course, larger systems can be built with the same functional principle.
Here is a picture of the setup as I currently use it consisting of lighting, Raspberry Pi HQ camera and the automatic turntable. The rotation and corresponding image recording is controlled by a small Python program. So I can record 51 images of the object in a 360 degree rotation within about 2 minutes.
Automatic turntable – the components
The necessary technical components for the automated turntable consists mainly of a Raspberry Pi, a stepper motor, 3D printed components and a motor driver for the stepper motor. Now I am a friend of cheap setups so the power supply is done with an old ATX power supply from the nearby recycling center. To use the Raspberry Pi camera very flexible I use two CSI to HDMI adapters. This way I can route the camera signal of the Raspberry Pi camera over a HDMI cable and have an easy to connect solution in case of transporting the system as well as I can choose any length of the HDMI cable.
The following picture shows the finished setup with all the components listed in the table below and installed here.
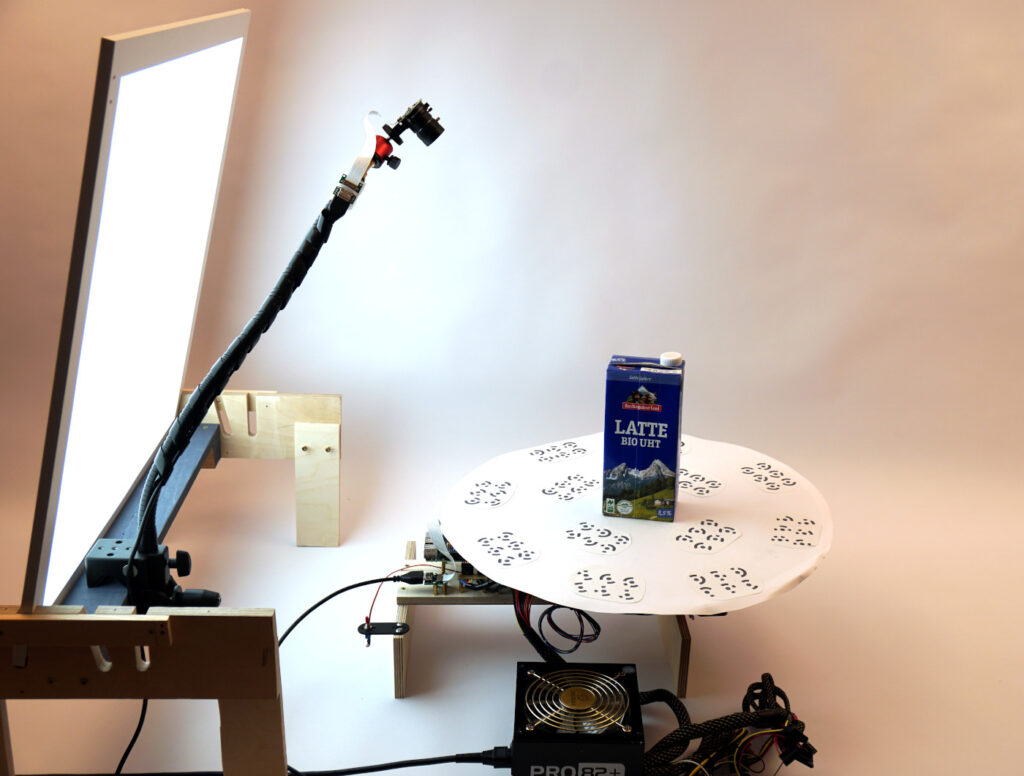
photogrammetry automatic turntable for precise picture recording setup
In the following section I list the components I have installed. That are then but some become but so you have a complete overview.
List of installed components
The list of components is so far complete and can of course be customized depending on the experience of the individual. It should help to get a quick overview of what was installed and used in my setup.
Hint: The links inserted here are affiliate links to the web store of Amazon.
I hope that the Amazon list here with the appropriate images is easy to read and quickly gives an overview even with the current prices. Surely can be found on eg ebay-kleinanzeigen or via other marketplaces one or the other product cheaper. But for me here as an author, the integration of the Amazon webshop with its API is very simple and therefore I rely on it.
- Raspberry Pi 3 Model B+ 10%
 (* = Affiliate-Link / Bildquelle: Amazon-Partnerprogramm)
 - Raspberry Pi Kamera HQ
") (* = Affiliate-Link / Bildquelle: Amazon-Partnerprogramm)
(* = Affiliate-Link / Bildquelle: Amazon-Partnerprogramm) - Raspberry Pi Kamera HQ Objektiv
 (* = Affiliate-Link / Bildquelle: Amazon-Partnerprogramm)
 - Micro SD Karte 32GB (hier bitte eine schnelle kaufen und nicht sparen)
") (* = Affiliate-Link / Bildquelle: Amazon-Partnerprogramm)
(* = Affiliate-Link / Bildquelle: Amazon-Partnerprogramm) - CSI zu HDMI Adapter
") (* = Affiliate-Link / Bildquelle: Amazon-Partnerprogramm)
(* = Affiliate-Link / Bildquelle: Amazon-Partnerprogramm) - Calumet Studio FlexArm (Calumet web-shop)
- Calumet Studio Clamp Befestigungsklammer (Calumet web-shop)
- micro USB Kabel (Stromversorgung Raspberry Pi)
 (* = Affiliate-Link / Bildquelle: Amazon-Partnerprogramm)
 - HDMI Kabel ca. 2m länge 19%
 (* = Affiliate-Link / Bildquelle: Amazon-Partnerprogramm)
 - ATX Anschlussplatine / Board
 (* = Affiliate-Link / Bildquelle: Amazon-Partnerprogramm)
 - Ein / Aus Schalter
 (* = Affiliate-Link / Bildquelle: Amazon-Partnerprogramm)
 - Lazy Susan Drehscheibenkugellager
, 4 Stück") (* = Affiliate-Link / Bildquelle: Amazon-Partnerprogramm)
(* = Affiliate-Link / Bildquelle: Amazon-Partnerprogramm) - Schrittmotor 12V / 2A
 (* = Affiliate-Link / Bildquelle: Amazon-Partnerprogramm)
 - Schrittmotor Motortreiber
 (* = Affiliate-Link / Bildquelle: Amazon-Partnerprogramm)
 - GT2 Riemen 460mm – 230 Zähne
") (* = Affiliate-Link / Bildquelle: Amazon-Partnerprogramm)
(* = Affiliate-Link / Bildquelle: Amazon-Partnerprogramm) - Jumper-Kabel
 (* = Affiliate-Link / Bildquelle: Amazon-Partnerprogramm)
 - GPIO Expander (optional)
 (* = Affiliate-Link / Bildquelle: Amazon-Partnerprogramm)
 - 3D Druck STL Dateien (audiomatica.com)
- Lochstreifen Platine (optional)
 (* = Affiliate-Link / Bildquelle: Amazon-Partnerprogramm)
 - Multiplex-Holzleisten vom Baumarkt zugeschnitten (12 cm x 1,5 cm x 80 cm)
- Holzschrauben 3,5mm x 30mm
Tools used
- Jigsaw
- Standboard machine with various wood drills
- 3D printer
- Soldering iron with accessories
The turntable I designed and built for my photogrammetry project looks like the picture below.
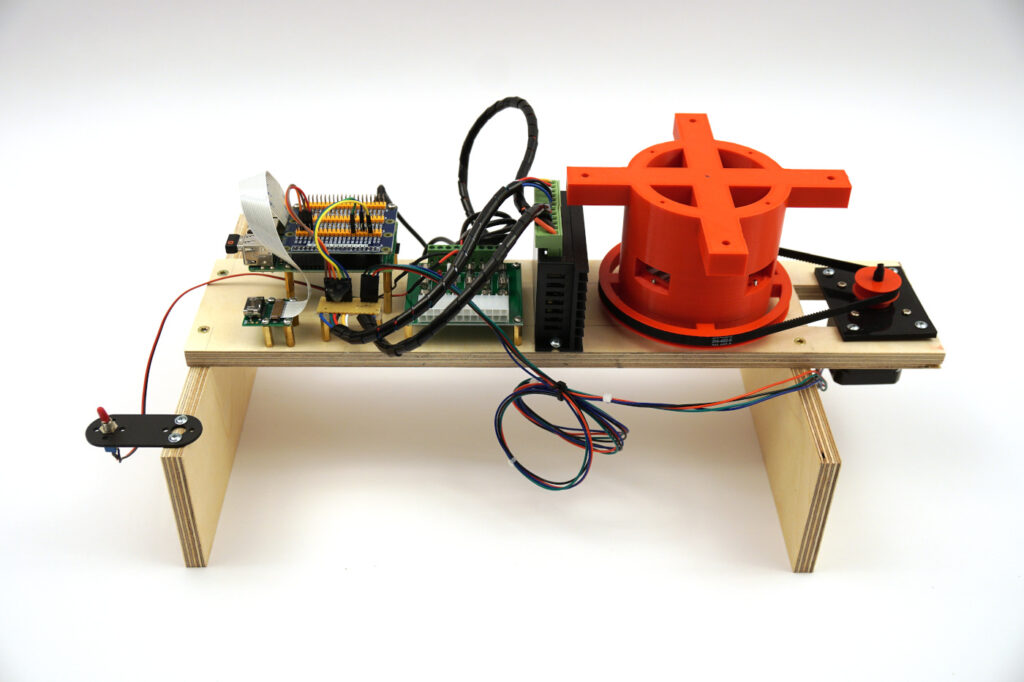
photogrammetry automatic turntable for precise picture recording turntable
In the section that follows now, I will go into detail about the setup and how I put everything together and why.
Automatic turntable – the structure
Now I will guide you step by step through the construction of the automatic turntable. First of all, I printed out all the necessary 3D components and ordered all the electronics. When all was available so also the wood and a large selection of wood screws and threaded screws it went then. Then followed the wiring.
A very big thank you goes to the web site audiomatica.com for the great work of a turntable with stepper motor. Here I could reuse the 3D models for my project.
Automatic turntable – stepper motor and turntable ball bearing
Important here was the ball bearing that holds the turntable and makes it rotate at all. I fixed the position for the turntable ball bearing together with the large gear wheel, GT2 belt and the stepper motor on the multiplex board. I then screwed the turntable ball bearing to the wood and screwed the gear along with the turntable mount to the turntable ball bearing. For the mounting of the stepper motor I first sawed a groove in the multiplex board. So I have the possibility to move the stepper motor a little bit and to tension the GT2 belt over this movement. Everything should turn quite easily by hand. Eventually I will add a belt tensioner, but so far the setup works very well and the GT2 belt does not slip.
In the following picture you can see the groove where the stepper motor sits to tension the belt individually.

photogrammetry automatic turntable for precise picture recording stepper motor
After I attached the holding device for the turntable and the stepper motor, I attached the two wooden strips as feet on the left and right below the board that serves as a support for the turntable and the electronics.
Automatic turntable – attach electronics
When mounting the electronics, it is important that the turntable does not hit the stepper motor driver, for example, when it is rotating. So make sure that there is enough distance to the turntable. Also, the turntable is screwed to the bracket that sits on the turntable ball bearing itself. These screws can look out depending upon length somewhat downward.
I have fixed my components so that I have short ways for the cables. So right next to the turntable on the left side is the stepper motor driver. This is the highest component but fits very well under the turntable. Because I have designed 3D model for the mounting of the plate so that the stepper motor fits with some distance below.
Since I am a friend of reusing and saving money I decided to use an old ATX power supply from the recycling center. So that I can connect this comfortably I bought an adapter board. I mounted it on the left side of the stepper motor driver. It supplies the necessary 12V for the stepper motor and the needed 5V for the Raspberry Pi.
The Raspberry Pi with the GPIO expansion board and CSI to HDMI adapter following on the far left so that I have good access to the connections of the Raspberry Pi like USB, network and HDMI output.
The small board for the control signals to the stepper motor driver and the connector for the stepper motor itself is optional. I only built it so that everything is a bit tidier and hopefully I can avoid loose contacts on the jumper cables.
In the following picture you can see all components.
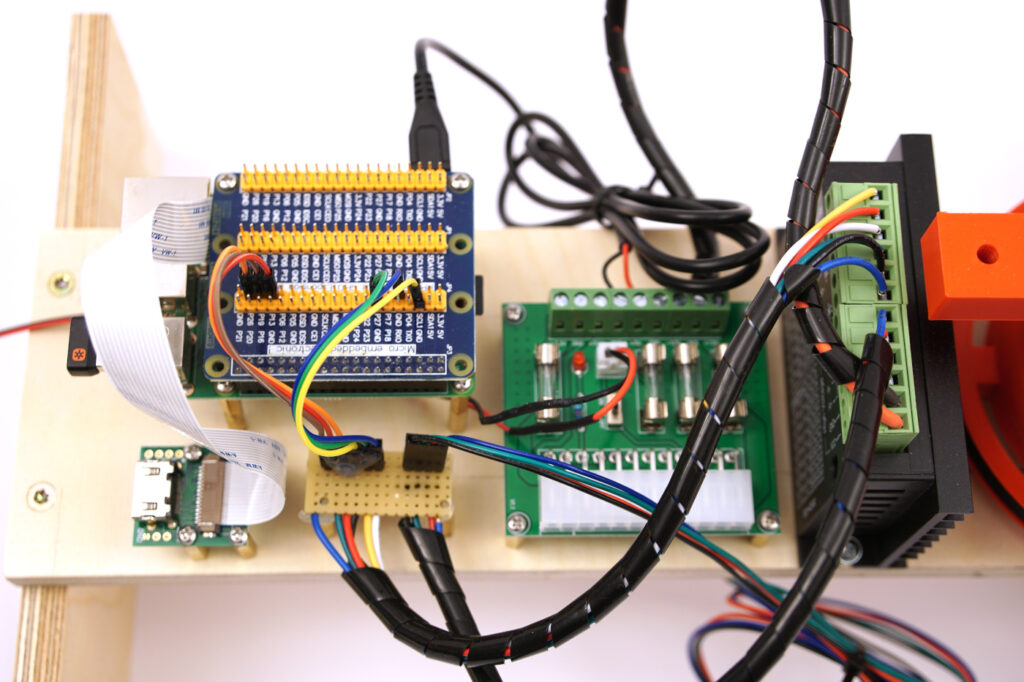
photogrammetry automatic turntable for precise picture recording electronics
Automatic turntable – wiring of electronics
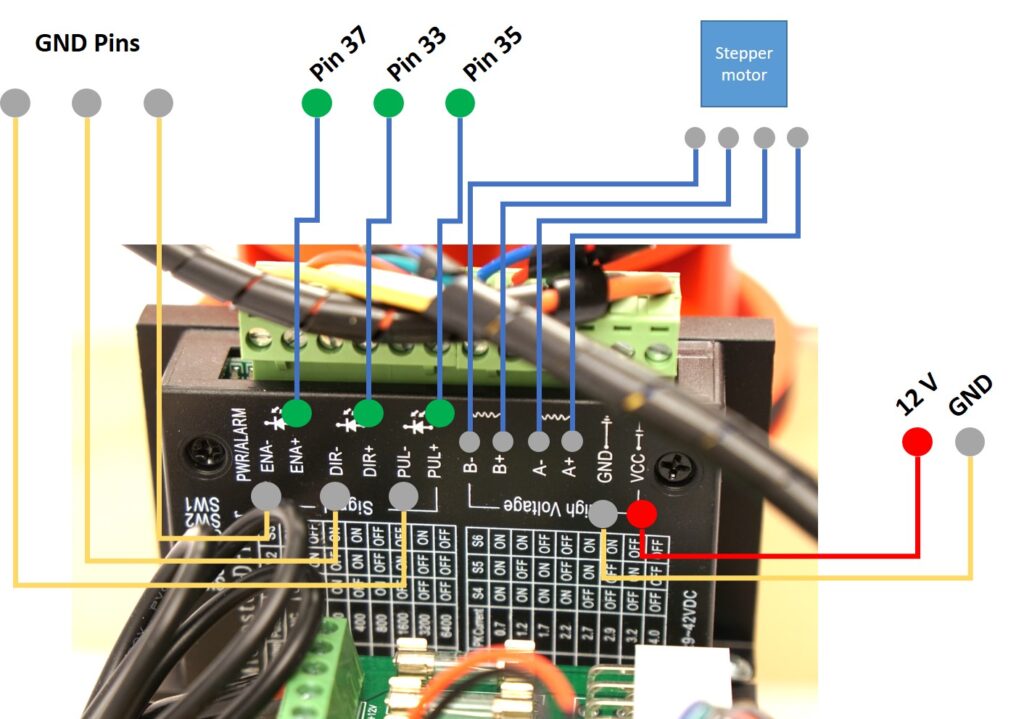
The wiring of the electronics is not difficult and goes quite fast. First the power supply with 5V for the Raspberry Pi should be established to test the ATX adapter board, the ATX power supply from the recycling center and if the Raspberry Pi starts like this. If this works, the 12V power supply with motor driver will be implemented so that it can drive the stepper motor.
So that the motor driver can be controlled from the Raspberry Pi, the cabling must also be done here. I describe now the wiring without the small self-built board in between. Because this leads the cables only 1:1 through. For the cabling of the motor driver with the Raspberry Pi now six female-to-male jumper cables are needed.
| motor driver Pin |
Raspberry Pi Pins |
| ENA- | GND |
| DIR- | GND |
| PUL- | GND |
| ENA+ | PIN 37 |
| DIR+ | PIN 33 |
| PUL+ | Pin 35 |
The following picture should help to understand the cabling between Raspberry Pi and the motor driver easier and especially to avoid errors.
photogrammetry automatic turntable for precise picture recording wires
The stepper motor is also connected to the motor driver. Four male-to-male jumper cables can be taken here. It is important here to pay attention to the connection description of the color code of the stepper motor. The four phases must be connected according to their colors in B-/B+ and A-/A+. If you make a mistake here, the stepper motor does not run properly and you have to search for the error.
Now all cables are set and the CSI to HDMI adapter has to be connected to the CSI slot of the Raspberry Pi with a CSI cable. When one of the two CSI to HDMI adapters has been attached to the camera side, the cabling is complete.
Conclusion
I have several attempts and days needed to complete the construction so far because I had to make some 3D printouts and optimizations. But now I am very satisfied with the setup and the automatic image recording saves me a lot of time and saves me the boring setup of having to turn the turntable by hand. I think the expenditure was worth it and the construction of this solution was also a lot of fun for me. Now the next chapter is about programming the application to control the stepper motor and the camera.
Here is a small video showing one of my first results. For this I used the demo version of Agisoft Metashape.

[Photogrammmetrie-EN]


Recent Comments