Video8 digitizing:
in the following article “Video 8 digitizing” I will exchange my experience on how to digitize 20 year old analog HI8 ( 8mm ) movies in the year 2011. I will also explain my configuration and used devices to digitize the 8mm magnetic tapes. My goal was to capture the movies by my own. I decided to capture the movies by my own because the offers I found in the internet were to expensive for me. I had up to 40 tapes for digitizing. The main configuration consists out of the following devices which I bought for digitizing the old tapes:
- HI8 video cassette recorder (analog Video8 / HI8)
- canopus video- analog / digital converter
- Video cutting computer (I used a MAC Mini)
- Video cutting program (I used Final Cut Express 4)
Only in the rarest cases the digitizing works fine by the first try. Noisy pictures, dull colors and perennially artifacts are disturbing the enjoyment of your digital output. It is important not to save money on the hardware and software. With a good video cutting software it is possible to clean noisy pictures and to correct dull colors. Even the analog digital converter is very important for a clear picture.
The HI8 tape is a small cassette like the Philipps music magnetic tapes but a little thicker. This small size enabled the companies which produced camcorders to shrink the video8 camcorders in size and to build camcorders for normal consumers like my grandmother.
Analog-digital converter:
To digitize the Video8 movies I looked for a cheap analog-digital converter who sync the video and audio stream. This is very important to save trouble with unsynchronized audio streams. I found the Canopus DV 110 which is cheap on ebay and digitize with a very good hardware solution.
After I had plugged the Canopus DV 110 to my video recorder I only had to plugg the ADVC 110 to my Mac Mini. I always use Apple products for digitizing analog movies like my Mac Mini. The Mac Mini recognized the Canopus at once. With iMovie09 it is possible to use the Canopus like a camcorder and to dub movies right away. The Canopus is pluged with a FireWire wire to the computer.
Format und space:
[sam_zone id=”2″ codes=”true”]
As recording format I used DV because the compression is very low. The only problem you have with the DV format is the large space you need to store the movie files. The space usage for 12 3/2 1 houre tapes was about 130 GB as raw data.
My configuration for digitize the Video8 tapes:
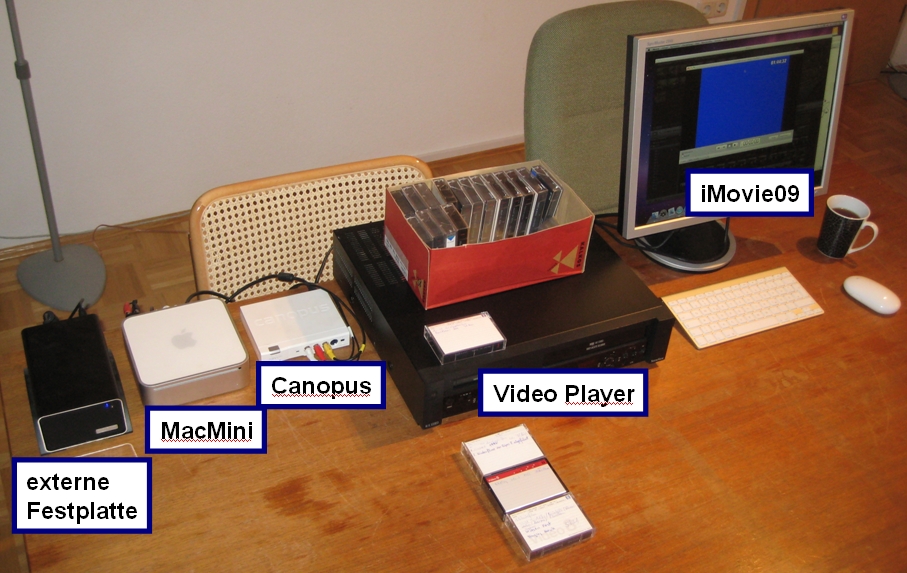
The following pictures shows my configuration for capturing Video8, HI8 and VHS magnetic tapes.
On the picture you see from the left to the right the following devices:
- external HDD for the raw data
- the MacMini with the installed iMovie09
- the Canopus ADVC 110 Analog-digital converter
- the video recorder with the supported Video8, HI8 and VHS formats
- my screen with iMovie in the importing modus
I paid about 430 euros in sum for the external HDD, Canopus Analog-digital converter and video recorder. It is not cheap but to have a minimum of trouble was important for me. A nother consideration was to give the tapes away to an external serivce. But the costs are higher and you do not have the raw data for editing the movies in a high quality.
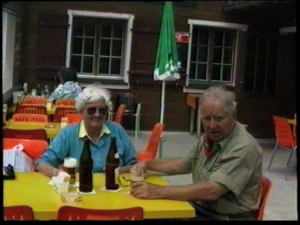
Here’s an example of the quality I reached:
Video8 example picture
Worth knowing to Video8:
On the WIKI homepage you find a lot of information about Video8 Link to Wiki.
My conclusion about digitizing Video8 tapes:
My first tries where very disappointing because the picture quality was very bad. After this I bought a used HI8 video recorder on ebay. The HI8 video recorder played back the movies in a very good quality without noises. I’m very happy with the result and now I started cutting the movies and building the DVD’s. If you have more then 20 tapes I think the expenditure is worth to buy all the stuff. If you do not have more then 20 tapes I think an external serivce is the better choice for digitizing.








Recent Comments